
Showing posts with label USB. Show all posts
Showing posts with label USB. Show all posts
USB Safely Remove is a utility for effortless and speedy disconnection of any removable devices. Not only does it save time, but it ensures that all data remains on a device when it is unplugged. Safely Remove is a system utility designed for quick and safely stopping USB Flash Drives connected to your computer. With this utility you can safely stop and remove USB Flash Drives much faster then using "Safely remove hardware"" icon in the system tray.
FEATURES:
Dislike reading boring documentation, but interested in one of the following things?
READ MORE
FEATURES:
- Unlimited number of processes to launch You may specify to launch any number of processes for specified event. For example you may setup launching a backup of the drive before stopping and following disomounting of a TrueCrypt volume
- Optional command line parameters You may pass such device parameters as drive letter, drive label, device PNP name into the process command line via parameter templates (e.g. this command line will browse a drive in Explorer on device connection: explorer.exe %DriveLetter%)
- New events to launch programs Now programs can be launched after device plugging, before device stopping, after device stopping and after device removing
- Global autorun You can setup a program to be launched not only for certain device, but for all hotplug devices in the system
Dislike reading boring documentation, but interested in one of the following things?
Browsing a drive with Explorer or Total Commander on device connection
- Scanning a device for viruses on its connection
- Making automatic backup of a flash-drive folder
- Automatic mounting and dismounting a TrueCrypt volume stored on a device
It is easy to disabling usb ports. Here I can post 2 methods to disable usb ports of your computer.
1. Through Device manager
READ MORE
1. Through Device manager
- Click Start > Run.
- Type devmgmt.msc.
- Select Universal Serial Bus Controller, right click and click "DISABLE".

- At starting the system press F2 or
DEL - In BIOS, Open "ADVANCED SETTINGS".3. In Advanced settings, select “USB Configuration” and disable USB Controllers to disable all USB ports
 .
.If you want to install Windows XP, but your notebook (or PC) has no CDROM, you should install Windows XP using USB Flash disk/Flash Drive/Thumb drive...
Just follow this guide :
Step 1:
Buy an USB Flash Drive (at least 2GB).
When you do this tutorial, please make sure your computer/laptop/PC has a CD-ROM (or DVD).so, now you have 2 computers, with CD-ROM support and without CD-ROM support.
Step 2:
Your download at mediafire keeps timing out, any other hosts available?
Mirror Deposit files.
Mirror Rapid share.
Mirror Easy-Share.
Mirror Mega upload.
Mirror Rapid share.
Mirror Easy-Share.
Mirror Mega upload.

This software pack contains 3 application :
BootSect.exe (Boot Sector Manipulation Tool)
Usb_prep8 (Prepares Windows XP Setup LocalSource for Copy to USB-Drive)
Step 3:
Double click Komku-SP-usb.exe

a window will appear... and click Install

Step 4:
Insert your USB Flash Drive.
Insert your USB Flash Drive.
When I made this tutorial, I was using 4GB Transcend USB FlashDrive...

Locate folder C:\Komku\PeToUSB\
double click PeToUSB.exe

a window will appear like this...

Destination Drive : select USB Removable
check on Enable Disk Format
check on Quick Format
check on Enable LBA (FAT 16x)
Drive Label : XP-KOMKU (or whatever you want)
then click Start
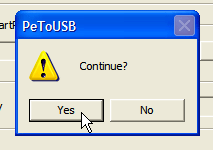
Click Yes to continue....

"You are about to repartition and format a disk. Disk: .... All existing volumes and data on that disk will be lost. Are You Sure You Want To Continue?"
click Yes

Wait a few seconds...

Click OK, and you can close PeToUSB window.
Step 5:
Open Command Prompt ...
Click Start > Run > type cmd > click OK

On Command Prompt window, go to directory C:\Komku\bootsect\
how to do this?
first type this cd\ and press Enter

then type cd komku\bootsect and press Enter

the result...

Don't close Command Prompt window, and go to step 6...
Step 6:
on command prompt window, type bootsect /nt52 H:

H: is drive letter for my USB Flash Drive, it may be different with yours...
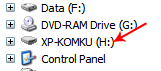
and press Enter
the result... "Successfully updated filesystem bootcode. Bootcode was succesfully updated on all targeted volumes."

don't close Command Prompt window, and go to step 7...
Step 7:
now type this cd.. and press Enter

then type cd usb_prep8 and press Enter

type usb_prep8 again... and pres Enter

Step 8:
Your command prompt window will look like this

Press any key to continue...
usb_prep8 welcome screen will appear

Prepares Windows XP LocalSource for Copy to USB-Drive:
0) Change Type of USB-Drive, currently [USB-stick]
1) Change XP Setup Source Path, currently []
2) Change Virtual TempDrive, currently [T:]
3) Change Target USB-Drive Letter, currently []
4) Make New Tempimage with XP LocalSource and Copy to USB-Drive
5) Use Existing Tempimage with XP LocalSource and Copy to USB-Drive
F) Change Log File - Simple OR Extended, currently [Simple]
Q) Quit
Enter your choice ::
now, insert your original Windows XP CD, or Windows XP with sata ahci driver to your CD/DVD ROM
and back to Command Prompt window
type 1 then press Enter...
"Browse For Folder" window will appear, select your CD/DVD drive and click OK

The result... "XP Setup Source Path" changed to G:\ (yours may be different)

now for point 2, if letter T is currently assigned to a drive in your computer, you must change it.... if not, leave it as it is
how to change it?
type 2 and press Enter...

"Enter Available Virtual DriveLetter"
for example you doesn't have drive S
so you type S and press Enter
back to usb_prep8 welcome screen...
now type 3 and press Enter...

"Please give Target USB-Drive Letter e.g type U" Enter Target USB-Drive Letter:
because my Flash drive letter is H

so, type H and press Enter...
after back to usb_prep8 welcome screen...
now type 4 and press Enter to make new temporary image with XP LocalSource and copy it to USB Flash Drive
please wait a few seconds..
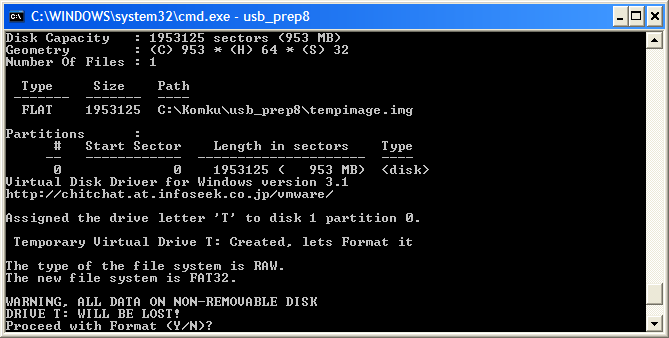
"WARNING, ALL DATA ON NON-REMOVABLE DISK DRIVE T: WILL BE LOST! Proceed with Format (Y/N)?"
type Y and press Enter
please wait....
when format virtual disk complete, press any key to continue...
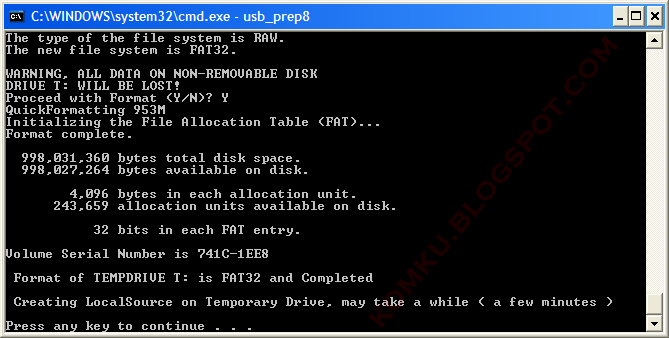
please wait... making of LocalSource folder is in progress...

when "Making of LocalSource folder $WIN_NT$.~LS Ready"
Press any key to continue...

"Copy TempDrive Files to USB-Drive in about 15 minutes = Yes OR STOP = End Program = No"
Click Yes, and wait...

"Would you like USB-stick to be preferred Boot Drive U: bla... bla..."
Click Yes

"Would you like to unmount the Virtual Drive ?"
Click Yes, wait a few seconds, and press any key....
press any key again to close usb_prep8...

Now, your USB Flash Drive is ready...
Step 9:
Now, insert your USB Flash Drive/Flash Disk/Thumb Drive to your notebook (e.g Acer Aspire One)
go to BIOS and make USB HDD (or USB ZIP in some other machine) as primary boot device....
then boot form your USB Flash Drive....
and select "TXT Mode Setup Windows XP, Never unplug USB-Drive Until After Logon"

After Hard Disk detected, delete all partition, create single partition... and install Windows XP on that partition...
and wait...

once text mode setup is complete, computer will restart....
this time select "GUI Mode setup Windows XP, Continue Setup + Start XP"

Continue Windows XP setup.... and Done!
Windows XP Installed....

Remember, you can use this tutorial to install Windows XP on all other computers.. not just Aspire One and Asus EEE-PC....
good luck!
For making a bootable ubuntu flash drive,You'll first need to download
the UNetbootin software and save it somewhere useful, since there's no installation required, just double-click to run.I chose to use an already downloaded ISO image of the Ubuntu installation cd, and then chose my flash drive, and clicked the OK button. The process will extract the files from the ISO image (or download them), copy them to the flash drive and then install the bootloader. Depending on what you are installing, this really doesn't take very long.
Once the process is completed, you'll be prompted to reboot… which you don't necessarily have to do unless you want to test booting the flash drive on the same machine you are using Otherwise you can hit the Exit button.
Make Sure the Partition is Active
If you get a boot device error when you try and boot from the flash device, it could be that your partition is not marked as active. What we'll do is use the command line diskpart utility to fix this… if you are inVista open an administrator mode command prompt by right-clicking and choosing Run as Administrator.
Now you'll need to run this command to
READ MORE
the UNetbootin software and save it somewhere useful, since there's no installation required, just double-click to run.I chose to use an already downloaded ISO image of the Ubuntu installation cd, and then chose my flash drive, and clicked the OK button. The process will extract the files from the ISO image (or download them), copy them to the flash drive and then install the bootloader. Depending on what you are installing, this really doesn't take very long.
Once the process is completed, you'll be prompted to reboot… which you don't necessarily have to do unless you want to test booting the flash drive on the same machine you are using Otherwise you can hit the Exit button.
Make Sure the Partition is Active
If you get a boot device error when you try and boot from the flash device, it could be that your partition is not marked as active. What we'll do is use the command line diskpart utility to fix this… if you are in
Now you'll need to run this command to
figure out the number of your flash drive:
list disk
list disk
This will show you the list of drives, and you will use the disk number in the "select disk" command:
select disk 1
select partition 1
active
select disk 1
select partition 1
active
The "active" command will actually mark the current partition as active, which is why you need to select the disk and then the partition. At this point you should be done.
Booting From the Flash Drive
Now that you are all finished, you can try and boot from the flash drive. Every BIOS is different, but most of them will have a message like "Press F12 for the Boot Menu", which is highly suggested. The boot menu will allow you to select the USB drive as the boot device. (apologies for the simply horrible camera phone screenshots) Instead of the regular Ubuntu boot menu that you might be used to seeing, you will see the UNetbootin menu, which has essentially the same options. Stay tuned, we're going to explore even more options for bootable CDs and USB drives that help you repair your computer.
Creating a shortcut to remove pendrive is one way of decreasing the time taken to actually remove it. Whenever you want to unplug your pendrive you will first look at the tray icon for Safely Remove Hardware. Then it will prompt a dialog box just as below. This involves a couple of steps and might take some time. But to do this in a jiffy, create a shortcut on your desktop to execute the action.
Rather than clicking on the task bar and then safely removing the pendrive you can eaily do so creating a shortcut:

Step 1: Create shortcut on your desktop by right clicking and selecting New Shortcut from the menu.
Step 2: Type “RunDll32.exe shell32.dll,Control_RunDLL hotplug.dll” . Click Next and then Finish.
Shortcut is created and now you can assign a shortcut key to it.
To do this, right click on it and select Properties-> Click on Shortcut Tab -> Assign a Shortcut Key to it(it will take CTRL + ALT by default).
Example: If you press 1, then the shortcut will be CTRL+ALT+1
READ MORE
Rather than clicking on the task bar and then safely removing the pendrive you can eaily do so creating a shortcut:

Step 1: Create shortcut on your desktop by right clicking and selecting New Shortcut from the menu.
Step 2: Type “RunDll32.exe shell32.dll,Control_RunDLL hotplug.dll” . Click Next and then Finish.
Shortcut is created and now you can assign a shortcut key to it.
To do this, right click on it and select Properties-> Click on Shortcut Tab -> Assign a Shortcut Key to it(it will take CTRL + ALT by default).
Example: If you press 1, then the shortcut will be CTRL+ALT+1
The advantage of NTFS file system is more security options and fast. Normally USB drive capacity is very small enough that NTFS is not recommended. But, nowadays USB drives are coming with larger capacity also. So we can format USB drive with NTFS to have more security options.
NTFS enabled USB Drives are write-able only on one PC and becomes read only on all other PCs. Hence, we can read and write on our own PC and transfer files to elsewhere without any fear of virus.
In XP, only FAT and FAT32 file systems are available in format options, use the below steps to format in NTFS File System.
NTFS enabled USB Drives are write-able only on one PC and becomes read only on all other PCs. Hence, we can read and write on our own PC and transfer files to elsewhere without any fear of virus.
In XP, only FAT and FAT32 file systems are available in format options, use the below steps to format in NTFS File System.


